ExpandableListViewを使ってみる
Androidで開閉式のアコーディオンテーブルを作成する際にExpandableListViewを使います
あまり使う機会がなく記事もあまりなさそうなので、記事にしようと思います
ExpandableListViewを使う手順
ExpandableListViewをアプリで使う手順は次の手順で行います。ExpandableListViewはListViewを継承しているため基本的にはListViewと同じ手順を踏むことになります
- ExpandableListViewの配置
- リストグループビューとリストアイテムビューのレイアウトの作成
- リストビューの設定(Adapterなど)
ExpandableListViewの配置
まずはExpandableListViewを配置します(Activity)
<?xml version="1.0" encoding="utf-8"?>
<androidx.constraintlayout.widget.ConstraintLayout xmlns:android="http://schemas.android.com/apk/res/android"
    xmlns:app="http://schemas.android.com/apk/res-auto"
    android:layout_width="match_parent"
    android:layout_height="match_parent">

    <ExpandableListView
        android:id="@+id/expandableList"
        android:layout_width="0dp"
        android:layout_height="0dp"
        app:layout_constraintBottom_toBottomOf="parent"
        app:layout_constraintEnd_toEndOf="parent"
        app:layout_constraintStart_toStartOf="parent"
        app:layout_constraintTop_toTopOf="parent" />

</androidx.constraintlayout.widget.ConstraintLayout>
リストグループビューとリストアイテムビューのレイアウトの作成
次にリストグループビューとリストアイテムビューのレイアウトを作成します。 リストグループビューが親要素でリストアイテムビューは子要素に相当します
今回は親要素と子要素を同じレイアウトにします。 今回はexpandable_cell.xmlという名前で作成します
<?xml version="1.0" encoding="utf-8"?>
<androidx.constraintlayout.widget.ConstraintLayout xmlns:android="http://schemas.android.com/apk/res/android"
    xmlns:app="http://schemas.android.com/apk/res-auto"
    xmlns:tools="http://schemas.android.com/tools"
    android:layout_width="match_parent"
    android:layout_height="wrap_content">

    <TextView
        android:id="@+id/expandableTitleTextView"
        android:layout_width="0dp"
        android:layout_height="wrap_content"
        android:layout_marginStart="20dp"
        android:layout_marginTop="14dp"
        android:layout_marginEnd="10dp"
        android:layout_marginBottom="15dp"
        tools:text="TextView"
        app:layout_constraintBottom_toBottomOf="parent"
        app:layout_constraintEnd_toEndOf="parent"
        app:layout_constraintStart_toStartOf="parent"
        app:layout_constraintTop_toTopOf="parent" />
</androidx.constraintlayout.widget.ConstraintLayout>
リストビューの設定
まずはAdapterを作成します。AdapterはBaseExpandableListAdapterクラスを継承して作成します
BaseExpandableListAdapterを継承すると次のようにoverrideしないといけない関数を次のように設定します
class ExpandableListAdapter(
    private val context: Context,
    var dataList: Map<String, List<String>>?
 ): BaseExpandableListAdapter() {
    //親要素の数を返す
    override fun getGroupCount(): Int {
        if (!dataList.isNullOrEmpty()) {
            return dataList!!.keys.size
        }
        return 0
    }

    //子要素の数を返す
    override fun getChildrenCount(p0: Int): Int {
        if (!dataList.isNullOrEmpty()) {
            val key = dataList!!.keys.elementAt(p0)
            val list = dataList!![key]
            if (!list.isNullOrEmpty()) {
                return list.size
            }
        }
        return 0
    }

    //親要素を取得
    override fun getGroup(p0: Int): Any {
        if (!dataList.isNullOrEmpty()) {
            return dataList!!.keys.elementAt(p0)
        }
        return ""
    }

    //子要素を取得
    override fun getChild(p0: Int, p1: Int): Any {
        if (!dataList.isNullOrEmpty()) {
            val key = dataList!!.keys.elementAt(p0)
            val list = dataList!![key]
            if (!list.isNullOrEmpty()) {
                return list[p1]
            }
        }
        return ""
    }

    //親要素の固有IDを返す
    override fun getGroupId(p0: Int): Long {
        return 0
    }

    //子要素の固有IDを返す(このサンプルでは固有IDは無いので0)
    override fun getChildId(p0: Int, p1: Int): Long {
        return 0
    }

    //固有IDを持つかどうかを返す(このサンプルでは持たないのでfalse)
    override fun hasStableIds(): Boolean {
        return false
    }

    //親要素のレイアウト生成
    override fun getGroupView(p0: Int, p1: Boolean, p2: View?, p3: ViewGroup?): View {
        var title = ""
        var convertView = p2
        if (!dataList.isNullOrEmpty()) {
            title = dataList!!.keys.elementAt(p0)
        }
        if (convertView == null) {
            val layoutInflater = context.getSystemService(Context.LAYOUT_INFLATER_SERVICE) as LayoutInflater
            convertView = layoutInflater.inflate(R.layout.expandable_cell, null)
        }

        val titleTextView = convertView!!.findViewById<TextView>(R.id.expandableTitleTextView)
        titleTextView.text = title

        return convertView
    }

    //子要素のレイアウト生成
    override fun getChildView(p0: Int, p1: Int, p2: Boolean, p3: View?, p4: ViewGroup?): View {
        var convertView = p3

        var title = ""
        val key = dataList!!.keys.elementAt(p0)
        val list = dataList!![key]
        if (!list.isNullOrEmpty()) {
            title = list[p1]
        }
        if (convertView == null) {
            val layoutInflater = context.getSystemService(Context.LAYOUT_INFLATER_SERVICE) as LayoutInflater
            convertView = layoutInflater.inflate(R.layout.expandable_cell, null)
        }

        val titleTextView = convertView!!.findViewById<TextView>(R.id.expandableTitleTextView)
        titleTextView.text = title

        return convertView
    }

    //子要素がタップ可能かどうかを返す(このサンプルでは可能にするのでtrue)
    override fun isChildSelectable(p0: Int, p1: Int): Boolean {
        return true
    }
}
dataListのkeyが親要素、valueが子要素になるようにしています
そして、adapterとExpandableListViewを紐づけます
val dictionary = mapOf("title1" to listOf("foo", "bar", "fizz", "buzz"), "title2" to listOf("fizz"))
adapter = ExpandableListAdapter(this, dictionary)
expandableList.setAdapter(adapter)
この状態で起動すると次のように開閉式メニューが実現できます

ただし、親要素の左側に開閉状態を表すマークが表示されています。 デフォルトで表示されるので表示した上で表示されるテキストの位置を変更するかマークを消すかどちらかで対応します
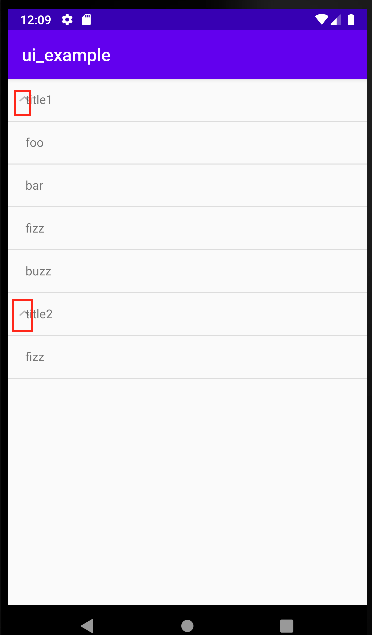
今回はマークを消す設定を追加します。
次のようにandroid:groupIndicator="@null"を追加することでマークを消すことができます
<ExpandableListView
        android:id="@+id/expandableList"
        android:layout_width="0dp"
        android:layout_height="0dp"
        android:groupIndicator="@null"
        app:layout_constraintBottom_toBottomOf="parent"
        app:layout_constraintEnd_toEndOf="parent"
        app:layout_constraintStart_toStartOf="parent"
        app:layout_constraintTop_toTopOf="parent" />
あまり使うことのないレイアウトだと思いますが、ListViewを継承しているということを覚えておくと大まかに作成できると思います