QiitaのAndroid Advent Calendar 2021の23日目の記事です
他の方も素晴らしい記事を投稿しているので、ぜひこちらからご覧ください!
今回はCardViewのカルーセル表示についてです
カルーセル表示とは横にスライドして次のデータを表示させるものです
下記のようなイメージのものを作成します

1. レイアウト作成
まずはレイアウトを作成します
大まかにはViewPager2のレイアウトとCardViewのレイアウトを作成します
<androidx.constraintlayout.widget.ConstraintLayout xmlns:android="http://schemas.android.com/apk/res/android"
    xmlns:app="http://schemas.android.com/apk/res-auto"
    xmlns:tools="http://schemas.android.com/tools"
    android:layout_width="match_parent"
    android:layout_height="match_parent"
    tools:context=".dashboard.DashboardFragment">

    <androidx.viewpager2.widget.ViewPager2
        android:id="@+id/cardPager"
        android:layout_width="match_parent"
        android:layout_height="200dp"
        android:layout_marginTop="16dp"
        android:orientation="horizontal"
        app:layout_constraintEnd_toEndOf="parent"
        app:layout_constraintStart_toStartOf="parent"
        app:layout_constraintTop_toTopOf="parent" />
</androidx.constraintlayout.widget.ConstraintLayout>
まずはViewPager2からです
色々設定していますが、重要なのはandroid:orientation="horizontal" の部分です。ここを設定することで横にスライドします。逆にverticalを設定すると縦にスライドするようになります
次にCardViewのレイアウトです
<?xml version="1.0" encoding="utf-8"?>
<androidx.cardview.widget.CardView xmlns:android="http://schemas.android.com/apk/res/android"
    xmlns:app="http://schemas.android.com/apk/res-auto"
    android:id="@+id/container"
    android:layout_width="match_parent"
    android:layout_height="match_parent"
    android:layout_marginStart="36dp"  // 横に見せる範囲とカードのマージンを足した値
    android:layout_marginEnd="36dp"   // 横に見せる範囲とカードのマージンを足した値
    app:cardBackgroundColor="#E91E63"
    app:cardCornerRadius="16dp"
    app:cardElevation="7dp">

    <androidx.constraintlayout.widget.ConstraintLayout
        android:layout_width="match_parent"
        android:layout_height="200dp">

        <TextView
            android:id="@+id/cardTextView"
            android:layout_width="match_parent"
            android:layout_height="match_parent"
            android:text="TextView"
            android:textAlignment="center"
            android:textSize="18sp"
            app:layout_constraintBottom_toBottomOf="parent"
            app:layout_constraintEnd_toEndOf="parent"
            app:layout_constraintStart_toStartOf="parent"
            app:layout_constraintTop_toTopOf="parent" />
    </androidx.constraintlayout.widget.ConstraintLayout>
</androidx.cardview.widget.CardView>
重要なポイントは2つあります
1つ目はCardViewのandroid:layout_marginStart="36dp" とandroid:layout_marginEnd="36dp" の部分です
ここでは横のアイテムを表示させるためにマージンを設定しています
どういう値かというと下記を見てもらうとわかると思います
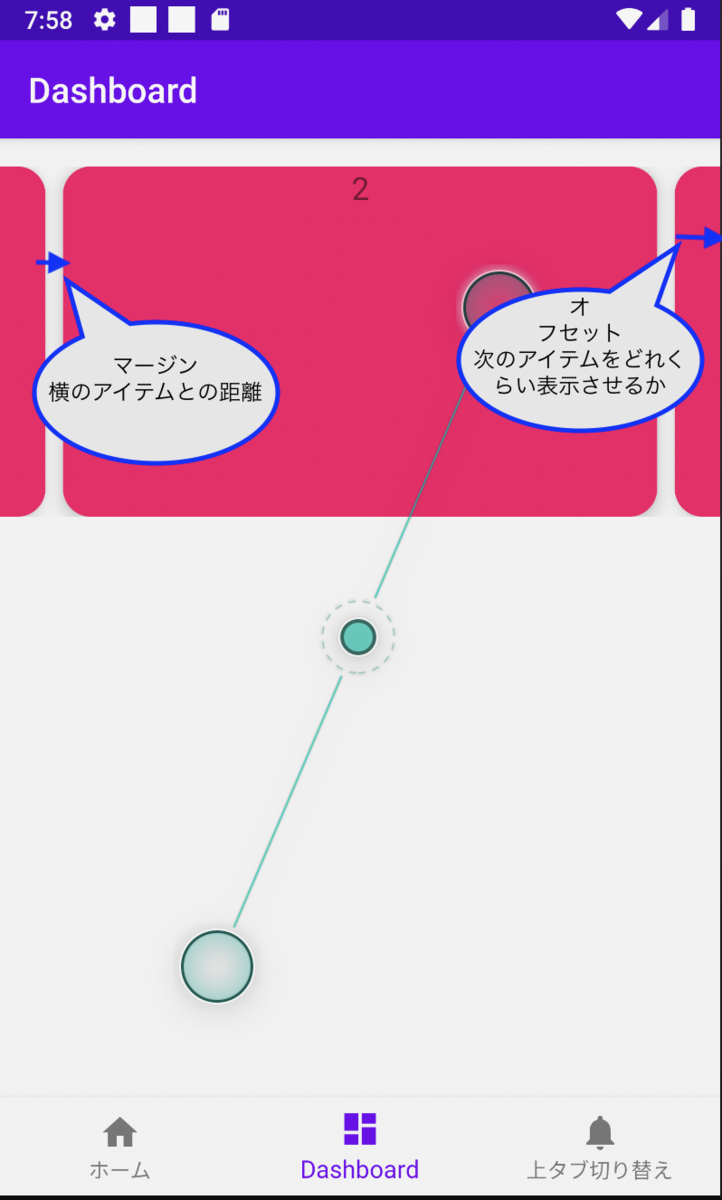
ここではマージンを次のアイテムとの距離、オフセットを次のアイテムをどれくらい表示させるかの値とします
CardViewで設定するmarginStartとmarginEndはマージンとオフセットの合計にします
2つ目はCardViewのheightとwidthはmatch_parentに設定しないとExceptionが発生します
java.lang.IllegalStateException: Pages must fill the whole ViewPager2 (use match_parent)のエラーです
あとは自分の好みでカスタマイズしてみてください
2. ソースコードでの設定
レイアウトを先ほど作成しましたが、それだけでカルーセル表示にはなりません。ソースコードで設定が必要になりますので見ていきましょう!!
CardViewを使うクラスで下記設定が必要になります
cardPager.adapter = CardSlideAdapter(listOf(1, 2, 3, 4))

val margin = view.context.resources.getDimension(R.dimen.card_margin)
val offset = view.context.resources.getDimension(R.dimen.card_offset)

cardPager.offscreenPageLimit = 2
cardPager.setPageTransformer { page, position ->
    val offset = position * (2 * offset + margin)
    page.translationX = -offset
}
1つづつ説明します
まず、CardSlideAdapterの部分はカードのデータをAdapterで定義しています。細かくは割愛します
marginとoffsetはdimensファイルで定義しています。直接数字指定すると表示がおかしくなる可能性が高いので、dimensファイルで定義するか数値をdpに変換する処理を行なってください
<resources>
    <!-- Default screen margins, per the Android Design guidelines. -->
    <dimen name="card_offset">16dp</dimen>
    <dimen name="card_margin"> 20dp</dimen>
</resources>
cardPager.offscreenPageLimit = 2の部分は左右のアイテムを描画するために必要です。これがないと左右のアイテムが表示されないです
そして、setPageTransformerはページが変わった場合の処理を行います。アニメーションを変えたり設定値を変更したりします
今回は左右の表示させる値とマージン分移動を打ち消しています。(page.translationX = -offsetの部分)
そうしないと1ページで1つ分のカードしか表示できなくなります
今回紹介した箇所以外にsetPageTransformerで色々なカスタマイズができると思います。それは試してみたら追記したいと思います